Guide to High Build Epoxy Installation in Kuwait
Most people assume that more epoxy equals more protection, but thickness without a rough surface is just a very expensive way to watch a floor peel. If you apply a high-build coating over smooth concrete, you aren’t building a floor; you’re building a giant sticker. In my experience with industrial sites in 2024, I've seen 30-mil systems fail in weeks because the installer prioritized "product depth" over "mechanical bite."
High-build epoxy is a heavy-duty shield for concrete floors. While standard paint is thin, high-build systems use special chemicals to create a dense, protective layer. This guide explains how to install a floor that resists chemicals and heavy traffic for years. It is a process that requires exact steps and the right tools for a professional finish.
2. Understanding High Build Epoxy Coatings
High-build systems are the "heavy lifters" of the flooring world.
-
Thickness: While standard coatings are thin, high-build systems are 10 to 30 mils thick.
-
Performance: They can bridge small cracks and hide bumps in the concrete.
-
Use: These are best for warehouses, labs, and garages where forklifts or heavy tools are used daily.
3. Pre-Application Planning
3.1 Assessing the Substrate
You must check the "health" of your concrete first. I follow the 22% rule: if the top layer of your floor is dusty or weak, your project is at risk.
-
Moisture Testing: Tape a 2’x2’ plastic sheet to the floor for 24 hours. If water drops appear under it, the floor has too much moisture.
3.2 Determining Requirements
Decide how thick the coating needs to be. For heavy forklift traffic, aim for 20+ mils.
-
Primer: You almost always want a primer. It seals the concrete so air bubbles don't get trapped in your thick topcoat.
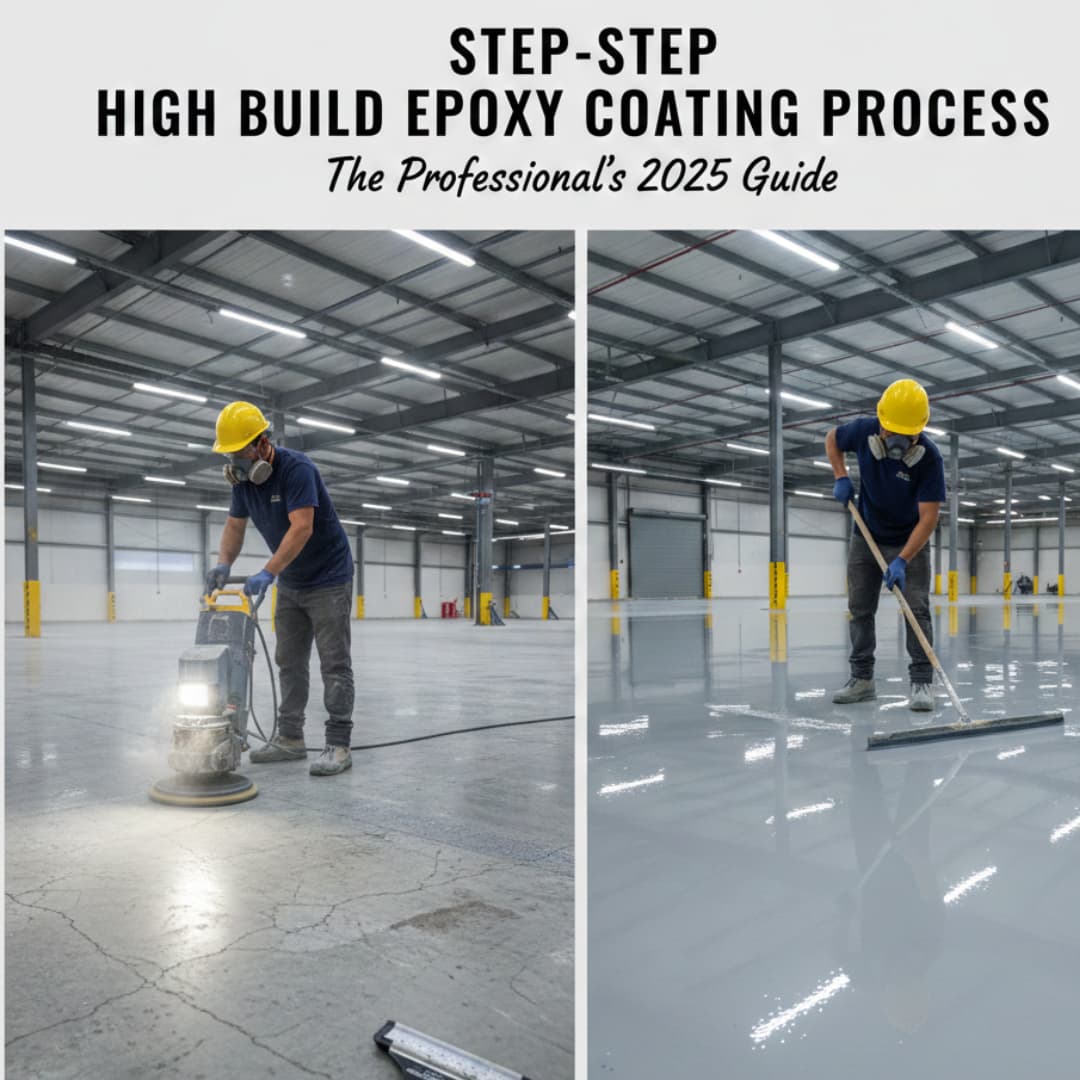
4. Surface Preparation (Critical)
Most epoxy floors fail because the surface wasn't ready. This is the most important hands-on step.
4.1 Cleaning
You must remove all oil and grease.
-
Degreasing: Use industrial cleaners. If water beads up on a spot, the epoxy will not stick there.
-
Vacuuming: Use a HEPA vacuum to remove every speck of dust.
4.2 Profile Creation
The concrete must feel like 60-grit sandpaper so the epoxy can "grab" it.
-
Grinding: Use a diamond grinder. Acid etching is outdated and often too weak for high-build systems.
-
Repair: Use an epoxy filler to fix cracks. If you skip this, the thick coating will eventually sink into the cracks.
4.3 Final Cleanup
After grinding, vacuum again. The floor must be 100% dry and dust-free.
5. Primer Coat
The primer acts like glue.
-
Mixing: Mix Part A and Part B exactly as the label says.
-
Application: Use a squeegee to push it into the concrete pores, then use a roller to smooth it out.
6. Mixing the High Build System
6.1 Components Overview
High-build epoxy has two parts: resin and hardener. You must follow the exact ratio (like 2:1). If you are off by even 2%, the floor might stay sticky and never dry.
6.2 Mixing Technique
-
Drill Mixer: Use a mechanical paddle mixer.
-
Scrape the Bucket: Scrape the sides and bottom while mixing. (And yes, I learned this the hard way after a floor had "soft spots" because I didn't scrape the bucket).
-
Pot Life: You only have about 20 minutes to work before the liquid gets too thick to use.
7. Application of High Build Epoxy
7.1 Application Tools
Use a notched squeegee to move the thick liquid and a medium-nap roller for "back-rolling."
7.2 Applying the Coating
Pour the epoxy in long lines (ribbons). Use the squeegee to spread it evenly. Then, roll over it to remove any lines or bubbles.
7.3 Additional Coats
If you need a second coat, wait 12–24 hours. If you wait longer than 24 hours, you must sand the first coat so the next one sticks.
8. Thickness & Film Build Control
Use a wet film gauge (a small metal tool) to check the thickness while the epoxy is wet. This ensures you aren't spreading it too thin.
9. Curing and Drying
-
Walk on it: 24 hours.
-
Drive on it: 7 days.
-
Temp: If the room is colder than 15°C, it will take much longer to dry.
10. Optional Enhancements
-
Non-slip: Add grit so the floor isn't slippery when wet.
-
Flakes: Sprinkle color flakes for a better look and extra texture.
11. Troubleshooting
-
Bubbles: Usually caused by air escaping the concrete. A good primer prevents this.
-
Peeling: This means the floor wasn't ground well enough.
-
Craters: Also called "fish-eyes," these happen if there was oil or silicone on the floor.
12. Maintenance
Sweep daily. Use a soft mop with water and a mild soap. Avoid using harsh acids that can dull the shine.
13. Safety Considerations
Epoxy has strong fumes and can bother your skin.
-
PPE: Wear gloves, eye protection, and a mask.
-
Air: Keep the area well-ventilated with fans or open doors.
Site Inspection Checklist for Epoxy Coating
To ensure your high-build epoxy project is successful, use this site inspection checklist before starting any work. This list helps identify potential "deal-breakers" that could cause the floor to peel or bubble later.
Section 1: Concrete Health & Quality
-
[ ] Age of Concrete: Has the concrete cured for at least 28 days? (New concrete holds too much water for epoxy).
-
[ ] Laitance Check: Can you scratch the surface with a coin and produce a lot of white dust? If yes, the weak top layer must be ground off.
-
[ ] Hardness: Use a Mohs Hardness Pick. If the concrete is softer than a "3," it may need a densifier before coating.
-
[ ] Existing Coatings: Is there old paint or sealer? These must be 100% removed.
Section 2: Moisture & Contamination
-
[ ] Plastic Sheet Test: Place a 2'x2' plastic sheet on the floor for 24 hours. Is there darkening or water droplets underneath?
-
[ ] Oil/Grease Test: Pour a small amount of water on stained areas. Does it bead up like a waxed car? If yes, degreasing is required.
-
[ ] Silicone Check: Have any tire shines or lubricant sprays been used recently? (These cause "fish-eye" craters in wet epoxy).
Section 3: Physical Condition & Repairs
-
[ ] Cracks: Are they "moving" (structural) or "static" (hairline)? Mark all cracks that need epoxy injection or filler.
-
[ ] Spalls/Pits: Are there holes or "pop-outs" from salt or impact? These need a sand-and-epoxy mortar patch.
-
[ ] Expansion Joints: Identify where the joints are. These must be honored (not filled) so the floor can move without cracking the epoxy.
Section 4: Environmental Factors
-
[ ] Temperature: Is the floor temperature between 15°C and 30°C? (Extreme heat makes epoxy dry too fast; cold stops it from drying).
-
[ ] Dew Point: Is the floor temperature at least 3°C above the dew point? (If not, moisture will condense on the floor and ruin the bond).
-
[ ] Ventilation: Are there enough windows, doors, or fans to move air?
Day-of-Application Timeline
Timing is everything with high-build systems. Once you mix Part A and Part B, a chemical reaction starts that you cannot stop. If you aren't ready, the epoxy will "cook" in the bucket and become unusable in minutes.
Following this schedule ensures you don't run out of time or end up with a sticky mess.
Preparation: The "T-Minus 1 Hour" Setup
-
Station Setup: Layout a "mixing station" on a piece of cardboard.
-
Tape Check: Re-check your blue painter's tape on the walls.
-
Tool Check: Ensure your notched squeegee is clean and your rollers are de-linted (use masking tape to pull loose hairs off the roller).
-
Safety: Put on your gloves and respirator.
The Application Timeline (Based on a 20°C Day)
| Time | Task | Focus Point |
| 08:00 AM | Final Vacuum | Remove any dust that settled overnight. Use a tack cloth for corners. |
| 08:30 AM | Pre-Mix Parts | Stir Part A and Part B separately for 2 minutes each before combining. |
| 09:00 AM | The Big Mix | Combine A and B. Mix for 3 minutes. Scrape the sides. |
| 09:05 AM | The Ribbon Pour | Pour the entire bucket in long ribbons. Never leave it in the bucket (it will overheat). |
| 09:10 AM | Squeegee Spread | Use the notched squeegee to pull the epoxy across the floor at your target thickness. |
| 09:25 AM | Back-Roll | Use the roller to level out squeegee lines. Move in the opposite direction of the squeegee. |
| 09:45 AM | Edge Finish | Use a brush to "cut in" any areas the roller couldn't reach. |
| 10:00 AM | Cleanup | Dispose of used rollers and buckets. Do not leave wet epoxy in a pile. |
Critical Rules for Success
-
The "No-Scrape" Rule: When pouring from your mixing bucket, never scrape the last bit out onto the floor. The resin on the walls is often unmixed and will cause "soft spots."
-
The 20-Minute Window: High-build epoxy is thick. If you are still rolling after 25 minutes, you will leave permanent marks in the finish.
-
Watch the Bubbles: If you see tiny bubbles appearing 30 minutes after rolling, you can use a "spike roller" to pop them while the floor is still wet.
Expert Recommendation for Kuwait Projects
If your checklist shows high moisture or heavy oil damage, it is best to consult with professionals who have the right industrial equipment.
Ajatech Solutions (ajatechsol.com) specializes in these inspections across Kuwait. Their team at East Ahmadi (Plot 47, Block 6) can perform professional moisture meter tests and diamond grinding to ensure your high-build system lasts for decades.
Contact Information:
-
Phone: +965 23983817 / +965 23987301
-
Email: info@ajatechsol.com
FAQs
1. What is a high build epoxy coating used for in Kuwait?
High build epoxy is mainly used for industrial floors, oil & gas facilities, warehouses, parking areas, steel structures, and concrete protection where thick film build, chemical resistance, and abrasion resistance are required under high heat and humidity.
2. How thick is a typical high build epoxy coating?
Most high build epoxy systems are applied at 200–500 microns (8–20 mils) per coat, depending on the product and surface condition. Some systems can reach up to 1000 microns in multi-coat applications.
3. Is high build epoxy suitable for Kuwait’s hot climate?
Yes, but only if surface temperature, dew point, and curing windows are controlled. Early morning or night application is common in Kuwait to avoid flash curing, pinholes, and amine blush.
4. What surface preparation is required before applying high build epoxy?
Proper prep is non-negotiable:
-
Concrete: Mechanical grinding or shot blasting
-
Steel: Abrasive blasting to Sa 2.5
Poor preparation is the #1 cause of epoxy failure discussed on forums.
5. Can high build epoxy be applied in one coat?
Sometimes, yes—but only on well-prepared surfaces and with approved products.
In practice, 2 coats are safer to avoid sagging, solvent entrapment, and uneven thickness.
6. Does high build epoxy crack under heavy loads or heat?
Epoxy itself is rigid. If cracking occurs, it’s usually due to:
-
Moving or weak concrete
-
No crack repair before coating
-
Incorrect thickness
For thermal movement areas, epoxy + flexible topcoat is recommended.
7. How long does high build epoxy take to cure in Kuwait?
Typical timelines:
-
Touch dry: 4–8 hours
-
Recoat window: 8–24 hours
-
Light traffic: 24–48 hours
-
Full chemical cure: 5–7 days
High temperatures can shorten pot life but not full cure time.
8. Is a topcoat required over high build epoxy?
Very often, yes.
-
UV-exposed areas → Polyurethane or polyaspartic topcoat
-
Chemical exposure → Specialized chemical-resistant topcoat
Bare epoxy can yellow or chalk outdoors.
9. What are the most common application mistakes discussed by contractors?
-
Skipping proper surface preparation
-
Applying too thick in one coat
-
Ignoring humidity and dew point
-
Incorrect mixing ratio
-
Using cheap rollers or tools
These mistakes account for most failures reported online.
10. Is high build epoxy better than normal epoxy coatings?
For industrial use—yes.
High build epoxy offers:
-
Faster thickness build
-
Better surface leveling
-
Higher durability
Normal epoxy is fine for light-duty areas, but oil & gas, warehouses, and parking decks typically require high build systems.